Super Easy Homemade Scrub

finishedscrub


Hey, sorry this post’s a little late this week. Its been a busy one, brewing up new ideas for Tune Out Pilates Retreats and we’ve got some really great plans in the pipeline for next year. All will be revealed soon but if you’ve not joined our mailing list then you can subscribe here  and you’ll be first to know. Plus in other exciting news this week, our January retreat in Arundel is now fully booked. Wow, you organised people! We’re really chuffed and our May retreat is now open to book for anyone that’s missed out. Thanks so much…

Anyway onto today’s post. You only have to search ‘body scrub’ on Pinterest to see how popular this stuff is to make and that’s why we love it – its unbelievably easy, its inexpensive, plus you get total control of what goes in to your skin and body. These body scrubs make great gifts (everyone loves a bit of homemade right?) but of course they are lovely to treat yourself.  So here goes…

1. First choose your packaging. We tend to opt for the sturdy Ikea jars. They look great and don’t break the bank balance but you could also use any other tin, tub or glass jars you have lying around.sugarscrub

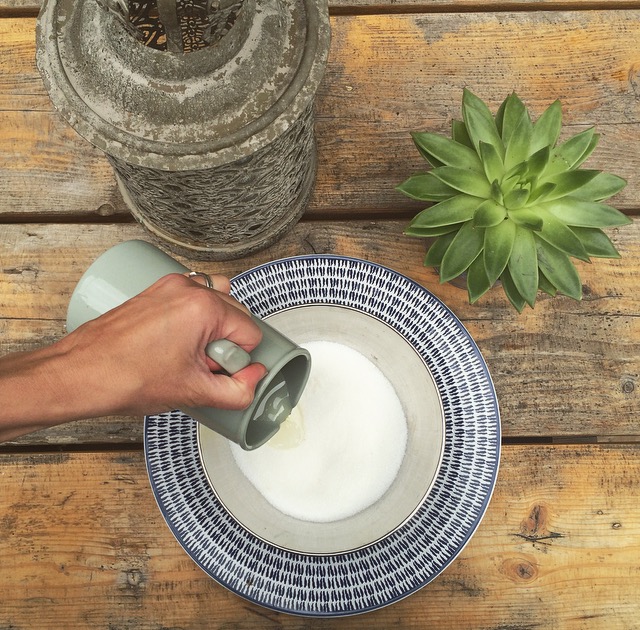
2. Choose your base oil. Choose skin friendly oils like coconut, jojoba or sweet almond (our favourite). You can play around with quantities but we usually use roughly equal parts of oil and exfoliator.

3. Choose your exfoliator. We love using plain sugar but you can also use demerara, sea salt, baking soda and even oatmeal! Mix both together in a large bowl. oils


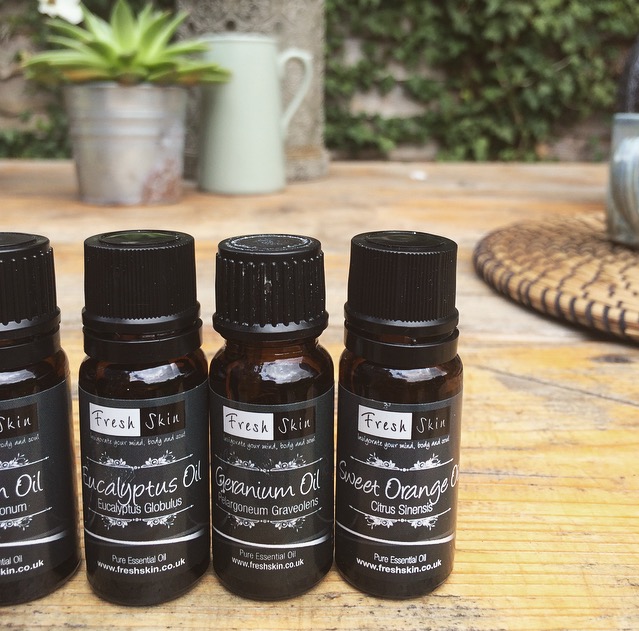
4. Choose your scent. How do you want to feel? Relaxed? Energised?  Check out this comprehensive list of oil uses but a great combo is simply lavender and peppermint, relaxing yet refreshing.

5. Play around. Try adding raw honey, coffee grounds, dried herbs and zest, anything goes really!

Enjoy and if you do make some we’d love to here about them  @tuneoutpilates

x


Balance & Biscuits.

Hi there…How are you all on this fine sunny Tuesday in London?

So in our first blog post we gave you some ways to help you tuneout. Its feels only right that for our next post we share some cake with you (well fudge to be precise!)

You see for us its all about the balance. The Yin and the Yang. The Black and the White. 80:20 as they say… And we do love cake. Its true! Which is why its always so exciting to find new ways of indulging our sweet tooth but in a healthy way.

Healthy food blogs are everywhere right now. They’re taking over our Instagram feeds and its great to be able to access so many inspirational recipes to suit our dietary needs. We really like Deliciously Ella, Hemsley + Hemsley, NaturallyElla to name a few. But one that we’ve been using time and time again, from way back when we had Shoreditch Pilates studio in the East End of London and now on our weekend and day retreats, is the wonderful Cookie and Kate. She is by far our go to blog for something that’s not only deliciously tasty but healthy, quick and easy, plus she has a real cute dog, and this fudge doesn’t disappoint. Its a real crowd pleaser.

I have to admit, Katherine is the master baker between the 2 of us, and during our summer retreat in Aldbeburgh, she whipped these up for our lucky retreaters. Just think, post Pilates class, sun shining, little cuppa. Seriously, what could be better?

Try them out – they’re super easy (I even managed them!) plus you can have a play with the recipe too. I added some dried fruit to make them nice a chewy inside and some dark choc.

Perfect for the holidays, kids, friends, after dinners…

Thanks Kate (from @cookieandkate)  We salute you!


‘EASY SALTED OAT FUDGE’

IMG_5033

Ingredients
  • ¾ cup creamy unsalted almond butter or peanut butter
  • ¾ cup semi-sweet chocolate chips
  • ⅓ cup maple syrup or honey
  • 4 tablespoons butter, sliced into small cubes, or ¼ cup melted coconut oil
  • ¾ teaspoon salt (scale back, to taste, if your nut butter is salted)
  • ½ teaspoon ground cinnamon
  • 1½ teaspoons vanilla extract
  • 1¾ cups oats ground into flour, see step 1
  • 1 cup whole pecans or other nuts
  • Optional: Flaky sea salt, for sprinkling on top
Instructions
  1. Prep work: Preheat oven to 325 degrees Fahrenheit. Cut two strips of parchment paper to fit across the interior of an 8 to 9-inch square baker. Criss-cross the papers at the bottom of the baker and fold the ends up the sides of the baker (see photos). If you need to make your own oat flour, blend 1 and ¾ cups oats in a blender or food processor until ground into a fine flour.
  2. Toast the nuts: Arrange the nuts in a single layer on a small, rimmed baking sheet (I used parchment paper for easy clean-up). Bake for 7 to 10 minutes, until fragrant (7 minutes for thinner/smaller/chopped nuts and about 10 for whole pecans). If you’re using large nuts like pecans, transfer them to a cutting board and chop them into small pieces with a chef’s knife.
  3. Make the fudge: In a medium-sized, heavy-bottomed pot, combine the nut butter, chocolate chips, sweetener, butter, salt and cinnamon. Warm the pot over medium heat, stirring often, until the mixture is melted throughout. Remove the pot from heat.
  4. Stir the vanilla extract into the pot, followed by the oat flour and finally, the chopped pecans. The mixture will have thickened up at this point, so you might have to put some muscle into it to mix in those pecans. You can do it!
  5. Carefully dump the fudge mixture into your lined square baker. Use the back of a sturdy mixing spoon to push the mixture across the baker so it’s roughly evenly distributed. Cover the bottom side of a thick, heavy-bottomed drinking glass or mason jar with parchment paper and press it down on the fudge repeatedly until the fudge is evenly packed. If you’re finishing the fudge with flaky sea salt, lightly sprinkle some on top now and gently press it into place with the bottom of your parchment-covered glass.
  6. Cover and freeze the fudge for 30 to 45 minutes, until it’s firm to the touch and no longer shiny in the middle. If you’re not in a hurry, you can refrigerate the fudge for a couple of hours or longer.
  7. Use a chef’s knife to slice the fudge into 1¼-inch wide columns and rows. Fudge will keep well for a couple of days at room temperature, or for a few weeks in the freezer, sealed in an air-tight freezer bag.
Notes :
Make it dairy free and vegan: Use dairy-free chocolate chips and coconut oil in place of the butter.
Make it gluten free: Use certified gluten-free oat flour or oats.
Change it up: If you want to include whole oats in the fudge for texture, use 1¼ cups old-fashioned oats and ¾ to 1 cup oat flour (add oat flour until you can hardly mix in any more).

Tune in Tune out. You choose…

comfortzone

Starting this blog has been a long time coming. I’ve ummed and ahhed over it for literally ages and written it and re written it several times, and Katherine will confirm this!

And although we have tons of stuff we want to share with you, starting something new can always be a little scary, right? First of all, it’s the whole exposure thing. Us saying here it is/I am, hope you like it/me..(eek!)

This is also known as stepping outside your comfort zone.

Honestly, we rather like being inside our comfort zone, nice and simple, always familiar but where’s the fun in that? Also apparently ‘great things never came from comfort zones…”

The funny thing is we see people stepping out their comfort zones all the time. For some of our ‘retreaters’ making the decision to come on a retreat can be a pretty big step. For others it may seem like the most perfectly normal (and wonderful) thing to do but for everyone that comes along on one of our retreats the best bit for us (and them) is seeing/feeling the layers of tension and stress fall away as they move through the weekend.

Our goal, is to guide you through the tuning out process, offering up a whole load of stuff along the way to help and hopefully inspire, and there you have it. That’s what this blog is all about. We’re not claiming to be experts or gurus but we do have a lot of stuff we’d love to share with you. On Pilates, making stuff, the outdoors, food and oh yeah, cake!

So here goes. We hope you enjoy reading our future blogs but first just a little taster to whet your appetite…


WAYS TO TUNEOUT.

1. CREATE. When sitting down with my 2-year-old daughter to do some colouring (or “skwiggles”) I noticed how therapeutic it was to colour in, then a little later I noticed a shop selling adult colouring in books. What a great idea (especially for those of us who are rubbish at drawing!) I did a bit of research and turns out it IS therapeutic and super relaxing. Give it a try…

2. BREATHE.  So underrated! Find yourself in a stressful situation. First thing in the morning. Last thing at night. Whenever you need it – it’s there, completely free of charge.

So try this – sit still. Close your eyes. Breath in through your nose. Feel your lungs full. Exhale through the mouth. Feel and enjoy the chest softening. Repeat 5 times. Voila.

3. SOMETHING NEW. You know life really can be pretty short. You never know what’s around the corner and if there’s something you’ve been longing to do for a while just do it. Make the call, send the email, book the spot and go. Who knows what it will throw up.


WIN WIN. 

We’d love to see your pics of you taking time to TUNEOUT.

Post them to Instagram with #tuneoutretreats and @tuneoutpilates to win one of our signature tuneout goodie bags.

Complete with super handy canvas tote, all natural and homemade products including, scrubs, balms, candle and eye mask. (Winner picked end of July ’15)

goodiebagtuneout